In my previous post , I have shown how to install Open Source Routing Machine ( OSRM ) and Nominatim ( Address generating tool ). Both of them use Open Source Map ( OSM ) Data. OSRM helps in finding the best routes between locations. Nominatim helps in generating the address for a given latitude and longitude. In this post, we’ll dig deeper into the OSM Data on how we can maintain our own osm tile server with carto-styled maps.
Whats a Tile Server ?

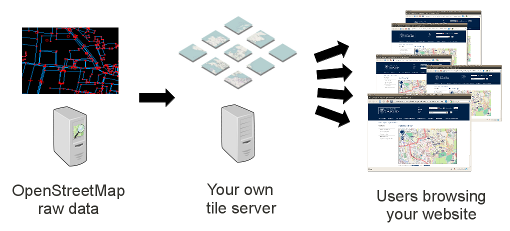
If you have been using google maps, then you are using tiles ( images of size 256*256 pixels ) generated by the google server. Incase you have your own tile server, your server would be generating the files. Heres how it works.
Why own a Tile Server?
As you know, google provides map tiles but it charges you. This is similar incase of any other third party tile supplier. If cost of running a server of your own costs you less, then it makes sense to have your own tile server. Have a look at the following Link . It gives a detailed view of the need to switch to OSM tiles.
Setting Up OSM Tile Server
For rendering tiles we need OpenStreetMap – Carto ( styles the look of the map ) , mod-tile ( an effective rendering machine ) and the OSM Data.
Time to get our hands dirty with code. We’ll use a separate user for rendering tiles, so lets get started by setting up the user. OSM Data will be extracted and stored in PostgresSQL DB. Our user osm will have all permissions to access the postgres db.
sudo apt install postgresql postgresql-contrib postgis postgresql-9.5-postgis-2.2
sudo -u postgres createuser osm
sudo -u postgres createdb -E UTF8 -O osm gis
sudo -u postgres psql -c "CREATE EXTENSION hstore;" -d gis
sudo -u postgres psql -c "CREATE EXTENSION postgis;" -d gis
sudo adduser osm
osm2pgsql will extract data from osm and store it in postgres db.
sudo apt install osm2pgsql
mod_tile and other tools along with it are used for building and rendering tiles from the data in postgres db.
sudo apt-get install -y autogen intltool
sudo apt install -y git autoconf libtool libmapnik-dev apache2-dev
git clone https://github.com/openstreetmap/mod_tile.git
cd mod_tile
./autogen.sh
./configure
sudo make
sudo make install
sudo make install-mod_tile
cd ..
sudo apt install -y curl unzip gdal-bin mapnik-utils node-carto
Lets get OSM file from here. You can choose whichever country, continent or the entire world map data you require for rendering.
wget -O map.osm.pbf url_of_the_pbf
Openstreetmap Carto is used for styling the map. Replace </path/to/map.osm.pbf> with path to the map,osm.pbf file,
cd /home/osm/
sudo -u osm wget https://github.com/gravitystorm/openstreetmap-carto/archive/v2.41.0.tar.gz
sudo -u osm tar xvf v2.41.0.tar.gz
sudo -u osm osm2pgsql --slim -d gis -C 3600 --hstore -S openstreetmap-carto-2.41.0/openstreetmap-carto.style <path/to/map.osm.pbf>
cd openstreetmap-carto-2.41.0/
sudo -u osm ./get-shapefiles.sh
sudo chmod 777 .
sudo -u osm carto project.mml > style.xml
We need to edit few files before getting started.
1.) In /usr/local/etc/renderd.conf
In default section, these parameters to be edited.
[default]
URI=/osm_tiles/
TILEDIR=/var/lib/mod_tile
XML=/home/osm/openstreetmap-carto-2.41.0/style.xml
HOST=localhost
TILESIZE=256
URI – path of the image/tile queried
TILEDIR – where to look for tiles queried.
XML – style of the tile
HOST – the domain to query for tiles
TILESIZE – it is size/pixels of the tile’s edge.
In Mapnik section, change plugins_dir to
plugins_dir=/usr/lib/mapnik/3.0/input/
2.) In /etc/init.d/renderd
Change the following parameters.
DAEMON=/usr/local/bin/$NAME
DAEMON_ARGS="-c /usr/local/etc/renderd.conf"
RUNASUSER=osm
and grant execute permissions
sudo chmod a+x /etc/init.d/renderd
3.) In /etc/apache2/mods-available/mod_tile.load
Change/Add the following parameter.LoadModule tile_module /usr/lib/apache2/modules/mod_tile.so.
Establish a symlinksudo ln -s /etc/apache2/mods-available/mod_tile.load /etc/apache2/mods-enabled/
4.) In /etc/apache2/sites-enabled/000-default.conf
Add the following to the default port section or the port section on which tile server will be listening.
LoadTileConfigFile /usr/local/etc/renderd.conf
ModTileRenderdSocketName /var/run/renderd/renderd.sock
ModTileRequestTimeout 0
ModTileMissingRequestTimeout 30
5.) In /etc/apache2/apache2.conf
Add the following to the default directory /var/www/html section or the directory section on which tile server will be directed to.
Options FollowSymLinks MultiViews
AddType text/html .png
Require all granted
Add the following to bottom of the file
IncludeOptional conf-enabled/*.conf
IncludeOptional sites-enabled/*.conf
Include /etc/apache2/mods-enabled/*.load
Include /etc/apache2/mods-enabled/*.conf
We are done with editing and configuring files.
Create and grant permissions for the following folder.
sudo mkdir -p /var/lib/mod_tile
sudo chown osm:osm /var/lib/mod_tile
Start the rendering service renderd.
sudo systemctl daemon-reload
sudo systemctl start renderd
sudo systemctl enable renderd
Restart Apache service
sudo systemctl restart apache2
sudo /etc/init.d/renderd restart
For better performance, cache the tiles/images.render_list -m default -a -z 0 -Z 10
To check successfull installation of the server.
Hit your browser.
http;//<IP>:<PORT>/osm_tiles/0/0/0.png
Map with 0 zoom level should be visible.

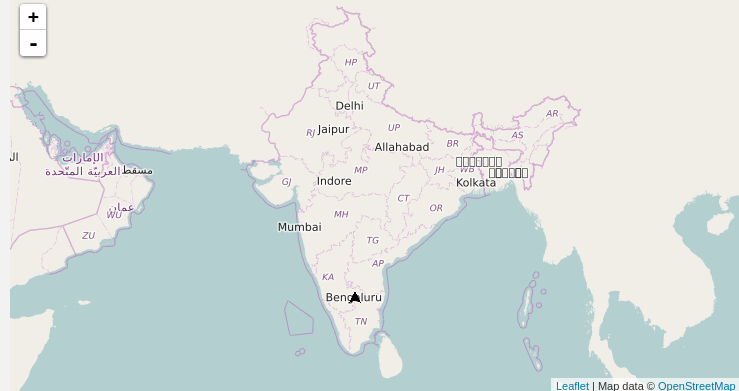
Once done with generating tiles on your server, how would you use them in your application. Leaflet.js is what you are looking out for. Its an open source Javascript library for interactive maps. This is what it would look like .
You have taken another step towards reducing your dependency on Google Maps. Lets keep it going. Cheers