
This blog covers how to setup a scalable MQTT broker with EMQX on AWS. It covers key aspects on how to setup a single server instance of EMQ X along with passwords for authentication.
In an earlier blog, I had covered setting up a Mosquitto MQTT broker on an AWS Ubuntu machine. As we scaled we ran into limitations of Mosquitto. Mosquitto is a single threaded application, runs on a single CPU and is not able to leverage multi-core machines to its fullest. Mosquitto also did not support clustering and therefore has no redundancy. If the machine fails for some reason which does happen occasionally on AWS, then you lose your only broker. This means downtime or even worse, that you may have to wake in the middle of the night to setup a new broker.
EMQX MQTT has many advantages over Mosquitto. EMQX is an open source MQTT broker based on the Erlang platform. Erlang is a programming language used to build massively scalable, realtime distributed system and is an ideal platform for an MQTT broker. It manages concurrency very well. Concurrency means it handles multiple threads of execution at the same time leveraging the multi-core capabilities of larger machines on AWS or your cloud provider.
EMQX with Authentication on an single Server
Step 1: Quick Start EMQX
EMQX is light and can operate on machines with 0.5 GB of RAMs also. Note that the following ports should be left open if you want to use this machine.Show 102550100 entriesSearch:
| No | Port | Open for | Reason |
|---|---|---|---|
| 1 | 1883 | Everone | MQTT Port |
| 2 | 18083 | Your IP address | Admin Dashboard |
| 3 | 8083 | Everyone | Websockets |
Showing 1 to 3 of 3 entriesPreviousNext
Launch a new machine and run the following commands
$ sudo apt update && sudo apt install -y \
    apt-transport-https \
    ca-certificates \
    curl \
    gnupg-agent \
    software-properties-common
$ curl -fsSL https://repos.emqx.io/gpg.pub | sudo apt-key add -

$ sudo apt-key fingerprint 3E640D53

$ sudo add-apt-repository \
    "deb [arch=amd64] https://repos.emqx.io/emqx-ce/deb/ubuntu/ \
    $(lsb_release -cs) \
    stable"

$ sudo apt update

$ sudo apt install emqx

$ sudo systemctl start emqx
Step 2: Add Authentication using plugins
EMQX supports multiple methods for authentication. I will show how to add simple authentication with user and password. By default, emqx does not require any authentication to connect to it. To change that one line will have to be edited in the emqx configuration file. To enable this authentication we will first edit the emqx.conf file.
$ sudo vim /etc/emqx/emqx.conf
Change the allow_anonymous parameter from true to false
allow_anonymous=false
Close the file and restart the the emqx server
$ sudo systemctl restart emqx
The next step is to enable the plugin for user and password
$emqx_ctl plugins load emqx_auth_username
This will load the emqx plugin for authentication with username and password. To add a username and password, type the following command
$ emqx_ctl users add <Username> <Password>
To check your server, you can review the dashboard which is running on port 18083. Open a browser and type in public IP address of your machine and port 18083, and you will be able to see the dashboard. The default user and password for the admin dashboard are admin and public respectively. Please note these are the credentials for the admin dashboard and the credentials we will need to subscribe or publish.
Explore the dashboard to understand its features. If you plan to deploy this publically change the admin password by going to the User section.
With this dashboard you can also check the MQTT broker using websockets or ws in short. Go to the menu item called Websockets, add the user and password you added using the plugin and you can connect and checkout your brand new broker.
Step 3: Testing with MQTT Box
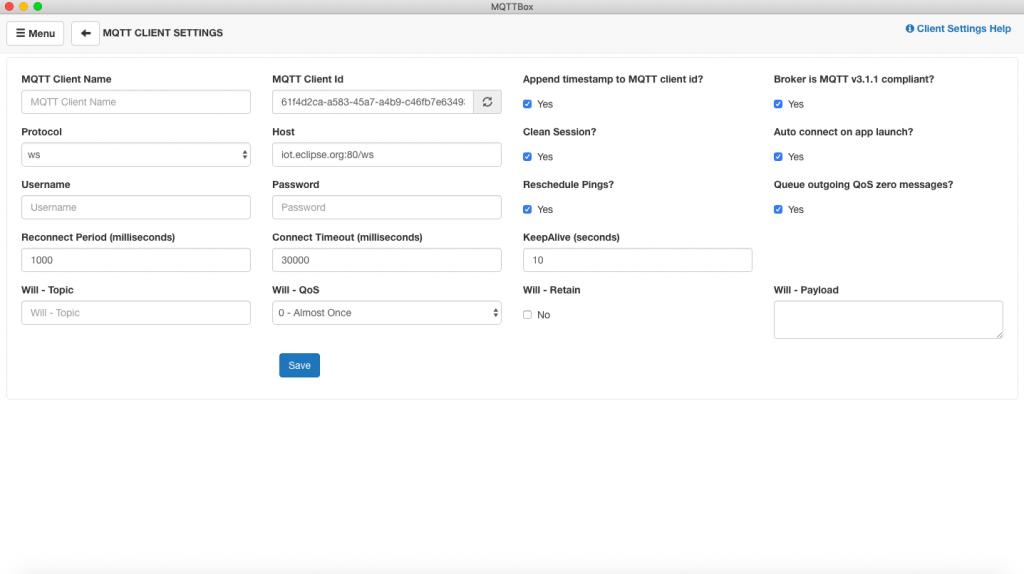
MQTT Box is an easy use application to test MQTT connections. This tool is available as both an application as well as a chrome extension. After installing the tool, add the host, choose mqtt as protocol, add the user and password for authentication and you can test your MQTT broker. Use the subscriber and publisher feature to test your new broker.